Top 5 Methods to Fix WMI Provider Host High CPU Usage after Windows 10 Creators Update
Jun. 23, 2022 / Updated by Daphne to Windows 10
Substantial users report that WMI Provider Host (WmiPrvSE.exe) keeps spiking CPU after Windows 10 Creators Update, which lags the system and leads to slow PC performance.

You may wonder what the WMI Provider Host is and why it takes such a high CPU usage on Windows Creators Update in the Task Manager. WmiPrvSE, the acronym for Windows Management Instrumentation Provider Service, functioning as the host to ensure all of the Windows management services to operate, without which programs in Windows would be difficult to running normally, resulting in unexpected computer issues like blue screen, black screen etc. To get rid of the WMI Provider Host consuming lots of CPU on Windows 10 CU issue without disabling it, here in this post, we list top 5 workarounds for you. You can go through them one by one until the WMI Provider Host high CPU usage is relieved.
Method 1. Scan for Viruses and Malware
It is highly recommended to run a virus and malicious software check after installing Windows 10 Creators Update since the problem could be caused by those malware attacks. Therefore you’d better remove them once they are detected.
Method 2. Uninstall Problematic Programs and Drivers
Drivers or applications may become incompatible after Windows OS update. If you installed or updated any program or driver lately, remove its service in Windows Service or uninstall it.
For problematic programs, you can use Event Viewer to diagnose.
1. Press Win + X to choose Event Viewer.

2. Click View and then select Show Analytic and Debug Logs.

3. On the left pane, follow the path: Applications and Service Logs >Microsoft >Windows > WMI Activity >Operational log. Write down the event ID listed as Error.

4. Press Win + X to choose Task Manager.
5. Turn to the Services tab and locate the processes with matching IDs as marked Error in the Event Viewer.

6. Choose either Uninstall or Disable to remove the service.
To uninstall incorrect device drivers that result in Windows 10 Wmiprvse excessive usage, you can use a professional driver troubleshooter, like Driver Talent. It could repair drivers and update you the most compatible ones within 2 minutes. Click the button below to get it and then follow the 3 easy steps below to remove incorrect drivers.
Step 1. Identify Drivers Issues
Click “scan” and Driver Talent will identify all the incorrect drivers installed on Windows 10 Creators Update.

Step 2. Update Drivers for Windows 10 Creators Update
Click “Download” or “Update” to install the best-matched drivers to resolve the Windows 10 WMI Provider Host causing extreme CPU usage bug after Creators Update.
Notes:Backup your drivers in advance in case you may need to roll back drivers in the future. And it is not recommended update what aren’t broken.
Step 3. Reboot Your PC
Reboot your computer to make the newly updated drivers come into effect.
Method 3. Perform sfc and DISM scan
sfc scan
1. Open a command prompt as an administrator.
2. Type sfc /scannow and press Enter to run the command.
3. The Sfc scan will now start. Don't interrupt the process and wait for it to complete.
4. After the scan is complete, restart computer and check whether the problem is resolved.
DISM scan
If the problem persists, you may have to run a DISM scan. To do this, follow these steps:
1. Start a command prompt as an administrator.
2. Type DISM /Online /Cleanup-Image /RestoreHealth and run the command.
3. Wait for the command to complete, don't interrupt it.
4. After the scan is complete, restart computer and check whether the problem is resolved.
If one of the core components of Windows is damaged, it can cause many problems, including high CPU usage. According to users, they can solve this problem only by running sfc and DISM scans. Both scans were designed to repair damaged Windows components.After completing the DISM scan, check if the problem still exists.
Method 4. Restart WMI Provider Host Service on Windows 10 Creators Update
It has been reported by numbers of users who came across the Windows 10 WmiPrvSE.exe high disk usage malfunction on the Creators Update that restarting the WMI Provider Host Service is effective to troubleshoot 30%-50% CPU usage issue related to WmiPrvSE.
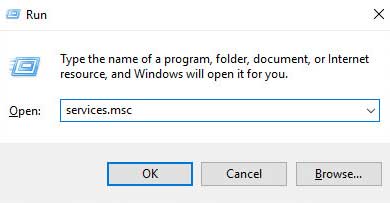
1. Press Win + R to launch the Run command, typing “services.msc” into the search box and then hit Enter.

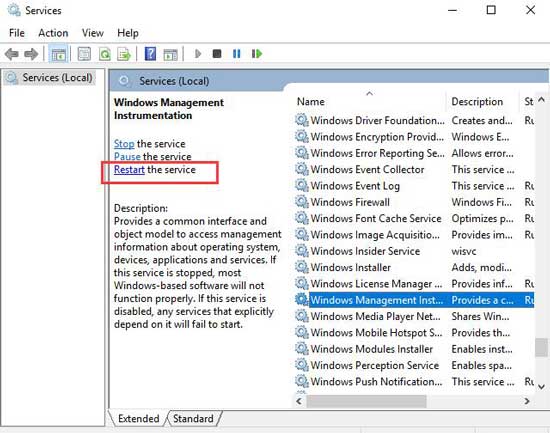
2. Scroll down the Service items to select Windows Management Instrumentation and then click Restart.

Note: Reboot your computer and check whether the problem solved. If continues, you should restart other WMI Provider Host related Service as below steps.
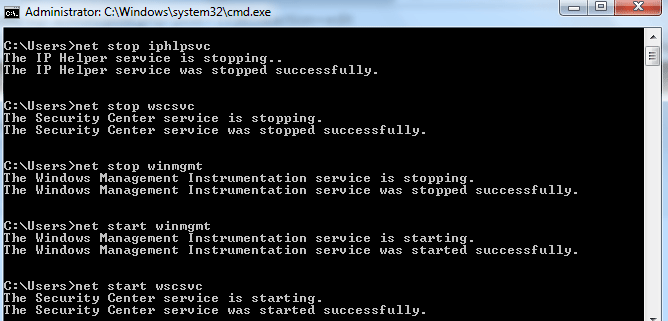
1. Type “cmd.exe” in the search bar to bring out the Command Prompt and choose Run as administrator.
2. In the Command Prompt window, type the following commands one by one and then hit Enter.
net stop iphlpsvc
net stop wscsvc
net stop Winmgmt
net start Winmgmt
net start wscsvc
net start iphlpsvc

3. Reboot your computer to see if the WMIPrvSE.exe high CPU and WMI Provider Host error persists.
Method 5. Boot into Safe Mode with Networking
1. On the keyboard, press the Win + R at the same time, then type msconfig in the search box and click OK.

2. Enter the "Startup" tab, then check the "Safe Boot" box, and then select the "Network" option. Click "Apply" and then click "OK" to save.

3. Ensure that the files and data have been saved, and then click "Restart" to enter safe mode.

4. In safe mode, press the Win + X at the same time, and then select Windows PowerShell (Admin).

5. Then enter the following command and press Enter.
msdt.exe -id maintenance diagnosis
You will see a troubleshooting window pop up. Click "Next" to run the troubleshooting.
If the troubleshooter detects a problem with your system, follow the instructions to fix it.

6. Still in the PowerShell window, type the following command and press Enter.
msdt.exe /id PerformanceDiagnostic
You will see the "Performance Troubleshooting" window pop up, just click "Next" to continue troubleshooting.

However, if you see a notification telling you that something needs to be changed in the system, please follow the actions required by the system.
7. After the troubleshooting process is completed, you need to return to the normal state. Repeat step 1. Then go to the "Startup" tab and clear the "Safe Boot" box. Click "Apply", and then click "OK" to save and exit. Restart the computer to normal mode.

See Also:
How to Fix High CPU Usage after Windows 10 Fall Creators Update
Top 10 Ways to Fix High CPU/RAM/Memory Usage after Windows 10 Update
Fix Windows 10 High Memory Usage/Leak after the Creators Update
Hope this article could be helpful for you on troubleshooting WMI Provider Host High CPU usage after upgrading to Windows 10 Creators Update. If you have more workarounds on the WMIPrvSE Exe excessive CPU hitches, please share with us in the comments section.

|
ExplorerMax |

|
Driver Talent for Network Card | |
| Smart and advanced file explorer tool for Windows platforms | Download & Install Network Drivers without Internet Connection | |||
| 30-day Free Trial | Free Download |


