Fix the "Wireless Service Is Not Running" Windows 10
Jan. 03, 2025 / Updated by Seraphina to Windows 10

Some Windows 10 users may face the "Wireless Service Is Not Running" issue. This guide offers effective solutions to quickly fix it and restore network connectivity.
1. Update Network Drivers
Outdated or corrupted drivers are common causes of the "Wireless Service Is Not Running" issue. Ensuring your network adapter drivers are up-to-date can effectively resolve the problem. Using Driver Talent for automatic driver updates is recommended, as it saves time and reduces the risk of downloading or installing incorrect drivers.
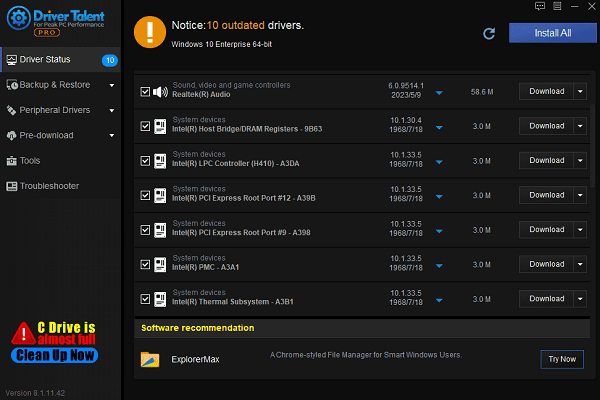
Download the latest version of Driver Talent, install the software, and open it. Click "Scan".
After the scan, the software will list any missing or outdated drivers. Locate the network adapter driver and click "Download".

Restart your computer after updating the driver to ensure the changes take effect.
2. Run an SFC Scan
Press Windows + S, type "Command Prompt", right-click it, and select "Run as Administrator".
In the Command Prompt window, type the following command and press Enter: sfc /scannow

The system will begin scanning and repairing damaged system files. This process may take several minutes.
Once the scan and repair are complete, restart your computer and check if the wireless network is functioning.
3. Restart the Wireless Network Service
Press Windows + R, type "services.msc", and press Enter to open the Services window.
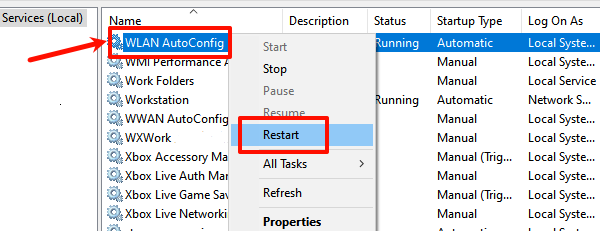
Locate "WLAN AutoConfig" in the list, right-click it, and select "Restart".

If the service is not running, right-click it and select "Start".
Check if the wireless connection is restored after restarting the service.
4. Reset Network Settings
Press Windows + I to open Settings.
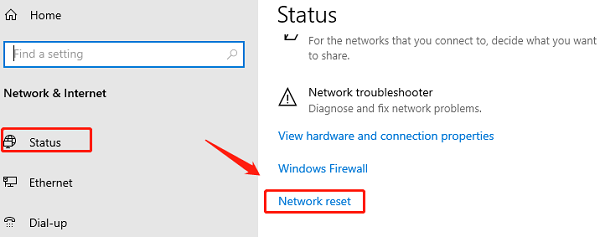
Navigate to "Network & Internet" > "Status".
On the Status page, find and click "Network reset".

Click "Reset Now". The system will automatically reset all network settings and prompt you to restart your computer.
After restarting, reconnect to your wireless network and check if the issue is resolved.
5. Use the Network Troubleshooter
Press Windows + I to open Settings.
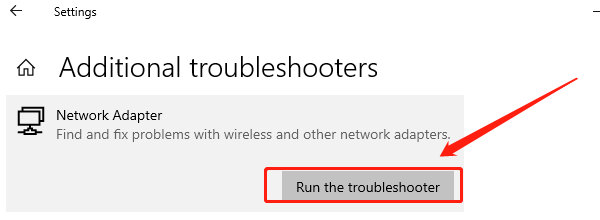
Go to "Update & Security" > "Troubleshoot" > "Additional Troubleshooters".
Find "Network Adapter" and click "Run the Troubleshooter".

Follow the on-screen instructions to complete the repair process.
After the troubleshooting is finished, verify if the wireless connection is working properly.
6. Perform a System Restore
Press Windows + S, type "Control Panel", and open it.
Navigate to "System and Security" > "System" > "System Protection".
In the System Properties window, click "System Restore".
Select a restore point from the list and click "Next". The system will revert to the selected state.
Follow the prompts to complete the restoration process. Your computer will restart automatically.
After the restoration, check if the wireless service is functioning.
These methods should resolve the "Wireless Service Is Not Running" issue on Windows 10. If the problem persists, consider seeking professional technical support.
See also:
Methods to Change the Keyboard Layout
5 Ways to Resolve the Audio Service Error on Windows 10
How to Fix the No Audio Error on Windows 11
Resolve Modern Warfare Not Launching on PC
6 Simple Ways to Fix Valorant Stuttering

|
ExplorerMax |

|
Driver Talent for Network Card | |
| Smart and advanced file explorer tool for Windows platforms | Download & Install Network Drivers without Internet Connection | |||
| 30-day Free Trial | Free Download |


