Solution to system crash after graphics card driver upgrade
May. 14, 2024 / Updated by Seraphina to Windows Driver Solutions

Upgrading graphics card drivers is an essential step to enhance computer graphics performance, improve gaming experience, and ensure compatibility with the latest software. However, this process is not always smooth sailing; sometimes, system crashes or instability may occur after the upgrade. This guide aims to provide a comprehensive solution to address and correct these issues, ensuring a smooth return to your daily computing operations.
CONTENTS:
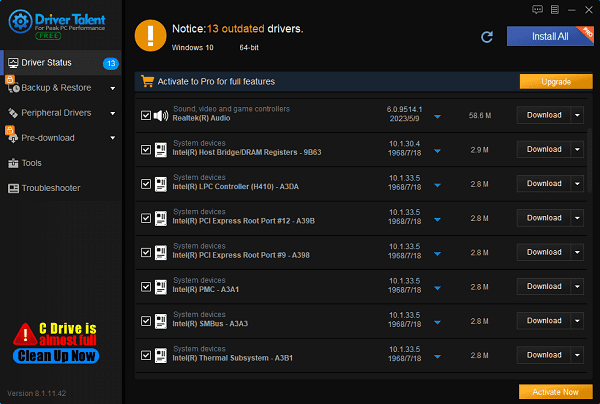
Faulty drivers may be the cause of system crashes. You can update your computer's drivers using Driver Talent software:
Install and open Driver Talent, then click "Scan".
The software will automatically identify your computer's hardware model and push corresponding driver updates to the list. Users can find the drivers to be updated, select the desired version for update, and click the "Download" button on the right.

After waiting for the download and installation to complete, it is recommended to restart the computer to ensure that the updated drivers take effect properly.
Before delving into solutions, it's crucial to understand why system crashes occur after updating graphics card drivers. Common reasons include:
Incompatible drivers: Newly installed drivers may be incompatible with your GPU model or operating system version.
Faulty installation: The driver installation process may be interrupted or damaged, leading to system instability.
Software conflicts: Other software or drivers installed on the system may conflict with the new graphics driver.
Hardware issues: System crashes may indicate underlying hardware issues exacerbated by the new driver.

Step 1: Boot into Safe Mode
Objective: Isolate the problem and determine whether it's caused by drivers or other software.
For Windows: Restart your computer and repeatedly press the F8 key during startup (or press Shift + F8 in Windows 8/10 to enter Safe Mode with Networking). Select "Safe Mode" from the advanced boot options menu.
For macOS: Restart your Mac and hold down the Shift key until the login screen appears to enter Safe Boot mode. If the system runs normally in Safe Mode, recent software or drivers (likely graphics drivers) may be the issue.
Step 2: Roll back the driver
Objective: Restore to a previous stable driver version.
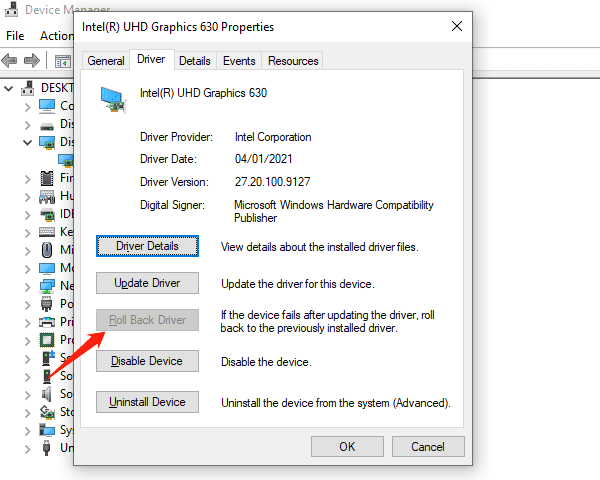
For Windows: Open Device Manager (right-click Start > Device Manager > Display Adapters > [Your GPU]), right-click the GPU, select Properties > Driver > Roll Back Driver, and follow the prompts to complete the rollback.

For macOS: If the issue occurred after a macOS update, you may need to use Time Machine backup or macOS recovery to reinstall the previous macOS version.
Step 3: Completely uninstall problematic drivers
Objective: Completely remove problematic drivers and their remnants.
(1). For Windows:
In Safe Mode, open Device Manager (you can search for "Device Manager" in the search box or find it in "Control Panel").
Locate the category of the device you want to uninstall, such as "Display Adapters" (if it's a graphics card driver), "Sound, video, and game controllers", etc.
Expand the category, right-click on the device you want to uninstall, and select "Uninstall device".
In the confirmation window that appears, check the option "Delete the driver software for this device", then click "Uninstall".
(2). For macOS:
Use Terminal to remove the driver. Locate the driver's kext file (usually located in /Library/Extensions/) and use the command sudo rm -rf /path/to/kextfile.kext. Then restart.
Step 4: Reinstall the correct driver
Objective: Reinstall compatible and stable drivers.
(1). For Windows:
Visit the GPU manufacturer's website (e.g., NVIDIA, AMD, or Intel) to ensure you download the correct driver that matches your GPU model and operating system version.

Temporarily disable any antivirus software.
Run the installation program as an administrator.
(2). For macOS:
For NVIDIA or AMD GPUs, download macOS-compatible drivers from their respective official websites.
Follow the installation program's instructions carefully.
Step 5: Verification and Testing
Objective: Confirm successful installation of the new driver and system stability.
After installation, check: Restart the system normally and confirm that the new driver is correctly recognized in Device Manager (Windows) or System Information (macOS).
Stress test: Use benchmarking or stress testing software (such as FurMark for Windows or Heaven Benchmark for macOS) to stress the GPU and observe for crashes or anomalies.
Step 6: Further Investigation
If the issue persists, consider the following additional steps:
Check BIOS/UEFI updates: Visit the motherboard manufacturer's website to find BIOS/UEFI updates that may improve compatibility.
Check hardware: Ensure the GPU is properly installed and receives adequate cooling. Overheating or loose connections can cause instability.

Third-party conflicts: Disable or temporarily uninstall any recently installed software that may conflict with the graphics driver.
Encountering system crashes after updating graphics card drivers can indeed be frustrating, but systematically following the above steps should help identify and resolve the issue. Remember, patience and thoroughness are key when dealing with complex system interaction issues. If standard troubleshooting proves ineffective, seeking assistance from manufacturer support or professional technicians may be the final step in restoring system stability and performance.
See also:
What is the USB flash drive and Methods for Encrypting USB Flash Drives
How to fix a keyboard that can't type numbers and the way to repair keyboard drivers
How to Reinstall the Operating System on a Computer
Nine Simple Methods to Fix WiFi Connected But No Internet
Five Ways to Quickly Update Intel Drivers in Windows 11

|
ExplorerMax |

|
Driver Talent for Network Card | |
| Smart and advanced file explorer tool for Windows platforms | Download & Install Network Drivers without Internet Connection | |||
| 30-day Free Trial | Free Download |


