8 Methods to Fix Audio Not Working in Windows 11
Nov. 19, 2024 / Updated by Seraphina to Windows 11

Some Windows 11 users have reported audio issues. This article offers solutions to fix the problem and restore normal audio.
Method 1: Check Audio Device Connections
If you're using external audio devices (such as headphones or speakers), check that the audio cable is properly connected to your computer's audio port.
Ensure the device is not loose or plugged into the wrong port. For USB audio devices, check that they are correctly inserted into the USB port.
Open Control Panel, select "Hardware and Sound", then click "Sound".
In the "Playback" tab, make sure the correct audio device is selected as the default. If not, right-click the device and choose "Set as Default Device".
Right-click the audio device in the Playback tab, and select "Test" to check if the device is functioning correctly.
Method 2: Update Audio Drivers
Outdated or corrupted drivers are a common cause of audio issues. Keeping your audio drivers updated is essential for proper audio function. We recommend using Driver Talent to automatically detect and update drivers, saving time and avoiding the risk of installing incorrect drivers.
Download the latest version of Driver Talent, install it, and open the software. Click "Scan".
After the scan, find the audio driver in the list of drivers to be updated or installed, and click the "Download" button.
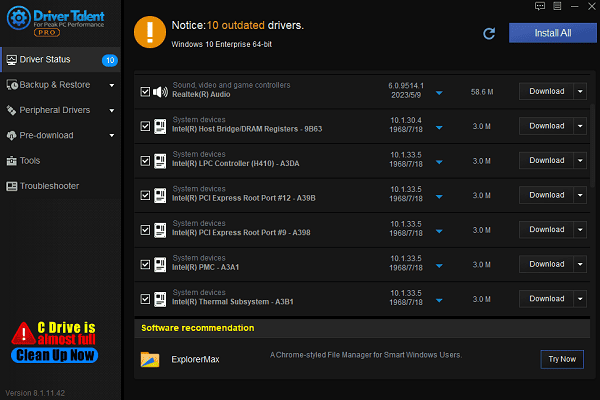
Once the update is complete, restart your computer to ensure the new driver is properly applied.
Method 3: Check Volume Levels
In the lower right corner of the taskbar, click the volume icon to ensure the volume is not muted.
Adjust the volume slider to make sure it's within an appropriate range.
If a specific app has no sound, right-click the volume icon in the taskbar, select "Open Volume Mixer", and make sure the app's volume is not muted or set too low.
Method 4: Restart Audio Services
Press Win + R to open the Run dialog, type "services.msc", and press Enter to open the Services Manager.
In the list of services, find "Windows Audio" and "Windows Audio Endpoint Builder".
Right-click "Windows Audio", select "Restart".
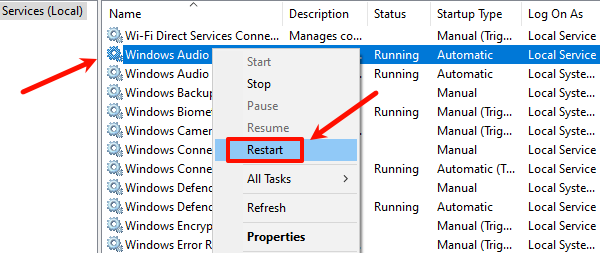
Similarly, right-click "Windows Audio Endpoint Builder", and select "Restart".
After restarting the services, check if the audio has returned to normal.
Method 5: Disable Audio Enhancements
Press Win + I to open Settings.
Go to the System tab, select "Sound", then click "All Sound Devices".
Select "Properties", scroll down, and find "Audio Enhancements", then select "Off" from the dropdown menu.
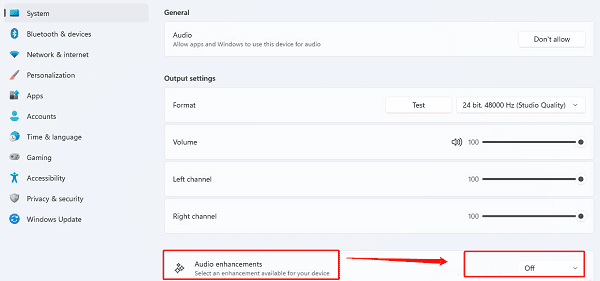
After completing these steps, test the audio to check if it is functioning correctly.
Method 6: Change Default Audio Format
Press Win + I to open Settings.
Go to the System tab, select "Sound", and click "All Sound Devices".
Select Properties, scroll down to the Output settings.
Click the dropdown menu next to "Format", and choose a different audio format (e.g., 24-bit, 48000 Hz).
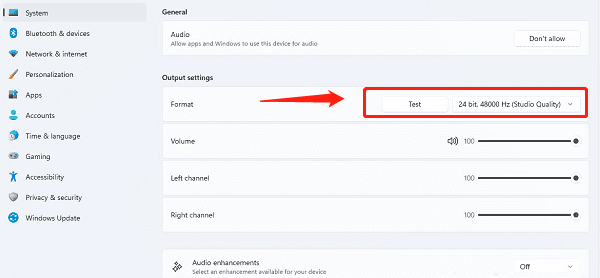
After changing the settings, test the audio to see if it works correctly.
Method 7: Run Audio Troubleshooter
Go to Settings, click "System > Troubleshoot > Other Troubleshooters".
Find the "Audio" option, click the "Run" button, and the system will automatically check for audio issues.
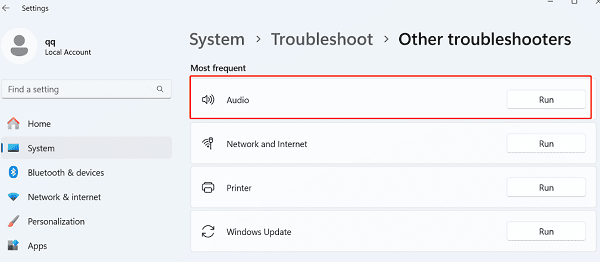
Follow the prompts provided by the audio troubleshooter to fix any detected issues.
Method 8: Check for Windows Updates
Go to Settings, click "Windows Update".
Click "Check for Updates", and the system will search for and install any available updates.
If updates are found, download and install them to ensure your drivers are up to date.
After completing the updates, restart your computer and check if the audio is functioning correctly.
Follow these steps to diagnose and fix audio issues on Windows 11. If the problem continues, contact the device manufacturer or technical support for help.
See also:
Guide to Reinstalling the Windows 10 Operating System
How to Fix God of War Keep Crashing on PC
Guide to Improving Graphics Performance
How to Fix Critical Process Died in Windows 10
How to Fix Logitech Mic Not Working

|
ExplorerMax |

|
Driver Talent for Network Card | |
| Smart and advanced file explorer tool for Windows platforms | Download & Install Network Drivers without Internet Connection | |||
| 30-day Free Trial | Free Download |


