How to Fix Windows 11 Not Entering Sleep Mode
Jul. 03, 2024 / Updated by Seraphina to Windows 11
When using Windows 11, you might face issues with the system not entering sleep mode, affecting your work efficiency and energy-saving features. Here are effective methods to fix this problem.
Method 1: Update Device Drivers
Drivers act as bridges between hardware devices and the operating system. Without proper drivers, many hardware components may not function correctly. Use "Driver Talent" to quickly detect and update computer hardware drivers with a single click.
Click the download button to get the latest version of Driver Talent. After installation, open the software and click "Scan".
Once the scan is complete, it will show which drivers are either not installed or need updating. Find the driver that needs updating in the results list and click "Download".

After the update is complete, restart your computer to ensure the updated drivers take effect.
Method 2: Check Power Settings
1). Open Power and Sleep settings:
Press Windows + I to open Settings, then click on "System" > "Power & Sleep".
2). Adjust Sleep settings:
Ensure under "Power & sleep", the times for "Screen" and "Sleep" are set appropriately.
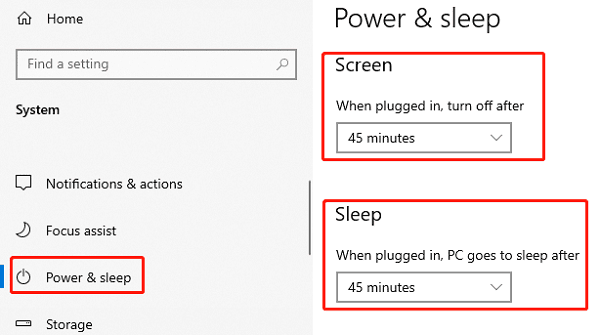
Ensure both plugged in and battery modes have appropriate sleep time settings for laptops.
Method 3: Enable Hybrid Sleep and Hibernate
1). Access Power Options:
Press Windows key + S, type "Control Panel" in the search box, then press Enter.
In Control Panel, click on "System and Security".
Then click on "Power Options".
2). Modify Advanced Power Settings:
On the Power Options page, select "Balanced (recommended)", then click "Change plan settings".
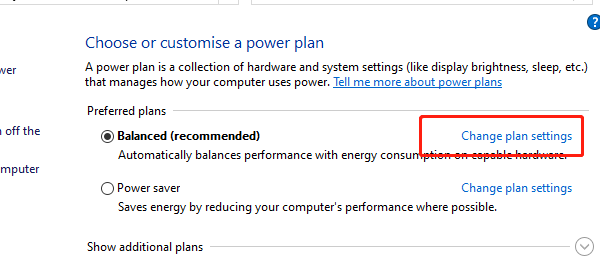
On the plan settings page, click "Change advanced power settings".
3). Enable Hybrid Sleep:
In the pop-up Power Options window, locate and expand the "Sleep" option.
Find "Allow hybrid sleep", set it to "On".
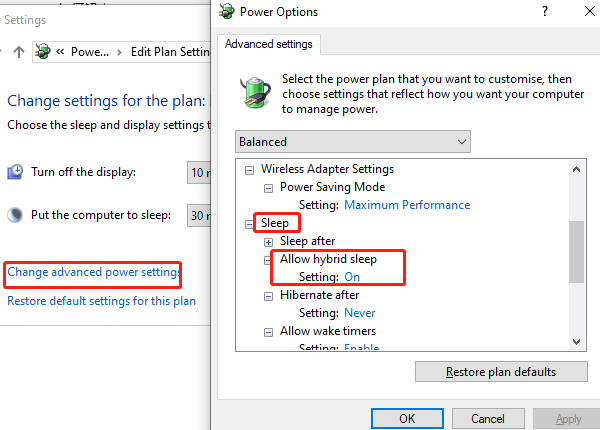
4). Set Hibernate Timer:
Under the "Sleep" option, find "Hibernate after", set it to an appropriate time, such as 30 minutes.
Click "Apply", then click "OK" to save changes.
Method 4: Run Power Troubleshooter
1). Open Troubleshoot settings:
Press Windows + I to open Settings, then select "Update & Security" > "Troubleshoot".
2). Run Power troubleshooter:
Under "Other troubleshooters", find "Power", then click "Run the troubleshooter".
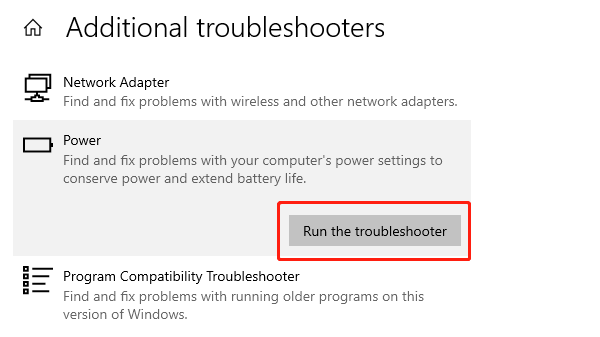
Method 5: Check Wake Timers
1). Access Power Options:
In Control Panel, select "Hardware and Sound" > "Power Options".
2). Disable Wake Timers:
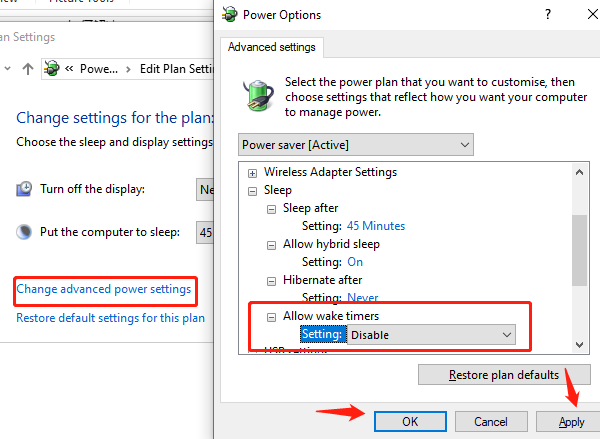
Select "Change plan settings" for the current power plan, then select "Change advanced power settings".
Expand "Sleep" > "Allow wake timers", set both "On battery" and "Plugged in" to "Disable".
Method 6: Check Processes and Devices
1). Open Command Prompt:
Press Windows key + R to open the Run dialog.
Type cmd and press Ctrl + Shift + Enter to run Command Prompt as administrator.
2). Check processes blocking sleep:
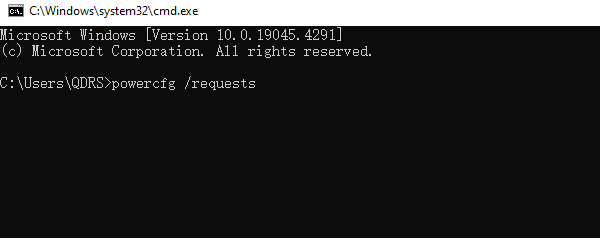
In Command Prompt, type powercfg /requests and press Enter.
3). Identify and disable processes blocking sleep:
The command will list processes and devices currently preventing the computer from entering sleep mode.
For instance, if a process is blocking sleep mode, try closing the process or uninstalling related software.
Method 7: Disable Away Mode
1). Open Registry Editor:
Press Windows key + R to open the Run dialog.
Type regedit and click "OK" to open Registry Editor.
2). Navigate to Registry Key:
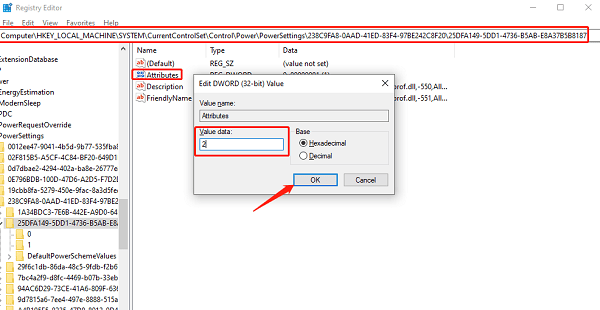
In Registry Editor, navigate to the following path: HKEY_LOCAL_MACHINE\SYSTEM\CurrentControlSet\Control\Power\PowerSettings\238C9FA8-0AAD-41ED-83F4-97BE242C8F20\25DFA149-5DD1-4736-B5AB-E8A37B5B8187
3). Modify Attribute Value:
In the right pane, right-click "Attributes" and select "Modify..."
Change the DWORD value to "2", then click "OK".
4). Open Power Options Editor:
Press Windows key + R to open the Run dialog.
Type cmd and press Enter to open Command Prompt.
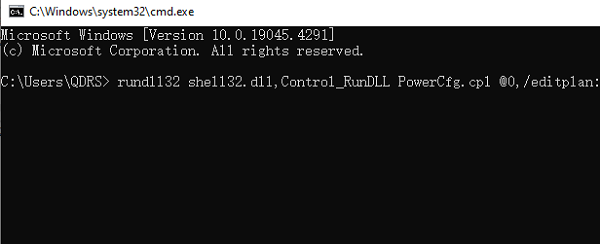
In Command Prompt, type the following command and press Enter: rundll32 shell32.dll,Control_RunDLL PowerCfg.cpl @0,/editplan:
5). Disable Away Mode:
In the Power Options editor window, click on "Sleep", then find "Allow Away Mode Policy".
Click on "Settings" and change it to "No" or "Never" to disable away mode.
Close the Power Options window and check if your computer can now enter sleep mode properly.
Using these methods, you can typically resolve issues where Windows 11 is unable to enter sleep mode. If the problem persists, consider seeking professional technical support or consulting Microsoft's official help resources. These methods should help restore normal system functionality and improve your overall user experience.
See also:
5 Ways to Fix Corsair Headset Not Working
Six Ways to Fix Lag Issues in The Sims 4 on PC
Guide to Updating HDMI Drivers on Windows 10
7 Ways to Fix Unidentified Network on Windows 11
How to Resolve High CPU Usage by ntoskrnl.exe on Windows

|
ExplorerMax |

|
Driver Talent for Network Card | |
| Smart and advanced file explorer tool for Windows platforms | Download & Install Network Drivers without Internet Connection | |||
| 30-day Free Trial | Free Download |


