How to Fix Windows 10 WHEA Uncorrectable Error
Nov. 27, 2024 / Updated by Seraphina to Windows 10

Windows 10 users may encounter the "WHEA Uncorrectable Error" BSOD. This article offers solutions to fix the error and restore normal use.
1. Check for Driver Updates
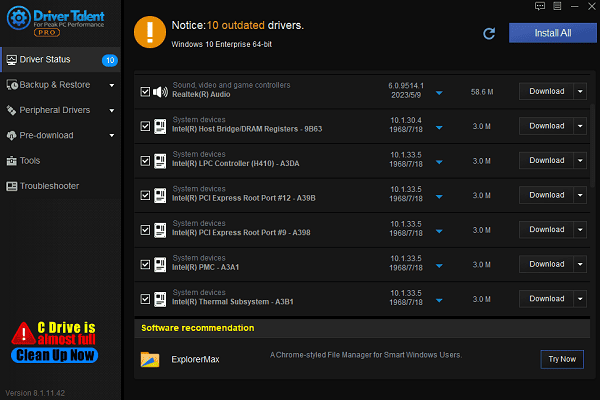
Outdated or corrupted drivers can conflict with hardware, causing WHEA errors. Regularly updating hardware drivers can help prevent such issues. We recommend using Driver Talent to automatically detect and update drivers, saving you time and avoiding the risk of downloading or installing incorrect drivers.
Click the download button to get the latest version of Driver Talent, install the software, and then click "Scan".
After scanning, it will display which drivers are missing or need updating. Find the driver that needs updating in the result list and click the "Download" button.

After updating, it is recommended to restart your computer to ensure the updated drivers take effect.
2. Check Hardware Connections
Ensure that internal hardware (e.g., graphics card, memory, hard drives, etc.) and external device cables (e.g., power cables, data cables, HDMI, USB, etc.) are not loose or damaged. Disconnect and reconnect all hardware devices to ensure each connection is secure.
If you are using a dedicated graphics card, memory, or other expansion cards, check if they are correctly installed in the motherboard slots. You can try reinstalling them or changing slots.
Ensure the power supply is stable. If the power supply is unstable or overloaded, it may also cause WHEA errors.
3. Check Memory
Turn off the computer and unplug the power cable, then open the computer case. Check if the memory sticks are securely installed and ensure they are fully seated in the memory slots.
Try inserting the memory sticks into different slots to determine if the issue is with the slot or the memory stick itself.
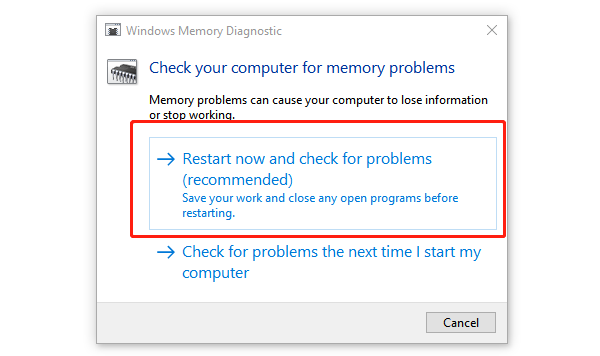
Press Win + R, type "mdsched.exe", and press Enter, then select "Restart now and check for problems".

The computer will restart and automatically check for memory issues. Check for any memory faults and consider replacing the faulty memory stick.
If the memory stick is faulty, it is recommended to replace it, especially if the memory diagnostic tool shows errors.
4. Perform Disk Check
Press Win + S, type "Command Prompt" in the search bar, and run it as Administrator.
Enter the following command and press Enter: chkdsk C: /f /r
(Note: C: is the system partition. If the system is installed on another partition, change the letter accordingly.)

If the system prompts whether to check the disk on the next reboot, press Y to confirm.
Restart the computer and wait for CHKDSK to scan and fix hard disk errors.
5. Run Hardware Troubleshooter
Press Win + S, type "cmd". In the search results, right-click "Command Prompt" and choose "Run as administrator".
Enter the following command and press Enter: msdt.exe -id DeviceDiagnostic
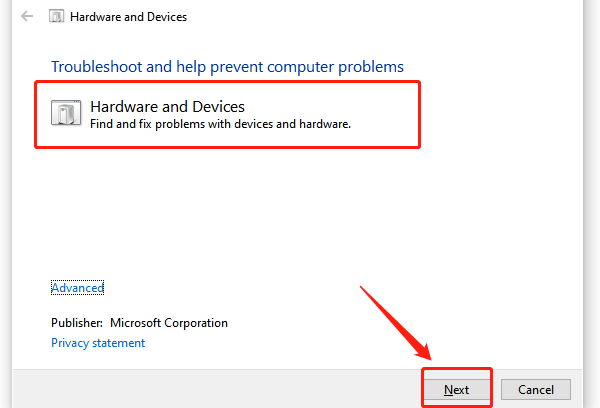
After executing the command, the "Hardware and Devices Troubleshooter" window will open.

Click "Next" to start the detection process. The system will automatically scan and detect device issues.
Follow the on-screen prompts to complete the troubleshooting process.
If the system detects any problems, it will display repair options. Select "Apply this fix" to perform the repair.
6. Disable System Overclocking
Press the BIOS setup key (usually F2, Delete, or Esc, depending on the motherboard model) during startup to enter the BIOS setup interface.
In the BIOS, find the overclocking settings related to the CPU or memory and restore them to their default values.
Save the settings and exit the BIOS, then restart the computer.
If XMP (Extreme Memory Profile) is enabled to increase memory speed, try disabling it to revert to a stable default memory frequency.
7. Perform System Restore
Press Win + R, type "rstrui", and press Enter to open the System Restore window.
The system will display available restore points. Choose one that was created before the issue occurred and click "Next".
Follow the on-screen instructions to complete the system restore process and return the system to a stable state. Note that system restore will affect software and settings but will not delete personal files.
Follow these steps to troubleshoot and fix the WHEA Uncorrectable Error. If the problem persists, seek professional technical support.
See also:
8 Methods to Fix Audio Not Working in Windows 11
Guide to Fixing Steam Won't Open
Solutions for Computer Offline Status
How to Fix Windows 10 Bluetooth Driver Errors
How to Fix the Windows 0xc000007b Error

|
ExplorerMax |

|
Driver Talent for Network Card | |
| Smart and advanced file explorer tool for Windows platforms | Download & Install Network Drivers without Internet Connection | |||
| 30-day Free Trial | Free Download |


