How to Fix Wi-Fi IP Configuration Errors
Sep. 09, 2024 / Updated by Seraphina to Windows 10

Many users experience the "Wi-Fi IP Configuration Error", which blocks network access due to IP conflicts or incorrect settings. This article provides common solutions to quickly resolve the issue and restore your connection.
Method 1: Restart the Router and Device
Turn off the router, wait for 30 seconds, and then restart it.
On your device, disconnect from Wi-Fi and restart the device.
After rebooting, reconnect to the Wi-Fi and check if the problem is resolved.
Method 2: Update Network Drivers
Outdated network drivers can be a common cause of Wi-Fi IP configuration errors. Ensuring your wireless network driver is up to date can improve the stability of your network connection. It is recommended to use Driver Talent for automatic driver detection and updates, which saves time and avoids installing incorrect drivers.
Click the download button to get the latest version of Driver Talent, install it, and open the software, then click "Scan".
After scanning, the software will display which drivers need to be installed or updated. Find the network driver in the results list and click "Download".
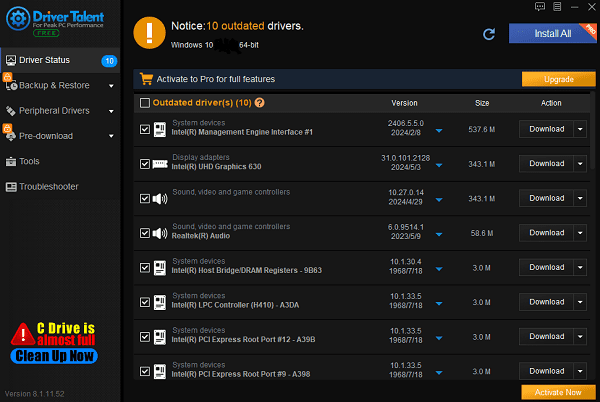
Once the driver is updated, it is recommended to restart your computer to ensure the updated driver works correctly.
Method 3: Flush the DNS Cache
Press Win + R to open the "Run" dialog box, type "cmd", and press Enter to open Command Prompt.
In the Command Prompt window, type the following command and press Enter: ipconfig /flushdns
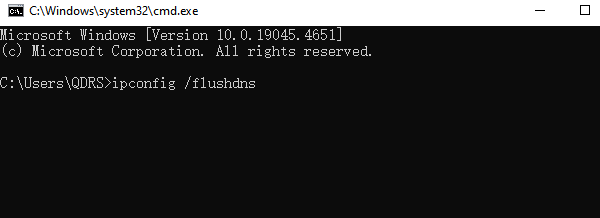
Once the command is executed, you should see the message "Successfully flushed the DNS Resolver Cache".
Close the Command Prompt and try reconnecting to Wi-Fi to see if the problem is resolved.
Method 4: Automatically Obtain an IP Address
Type and open "Control Panel" in the search box.
Click "Network and Sharing Center" and select "Change adapter settings".
Right-click the connected network and select "Properties".
In the "Properties" window, double-click "Internet Protocol Version 4 (TCP/IPv4)".
In the pop-up window, ensure "Obtain an IP address automatically" and "Obtain DNS server address automatically" are checked.
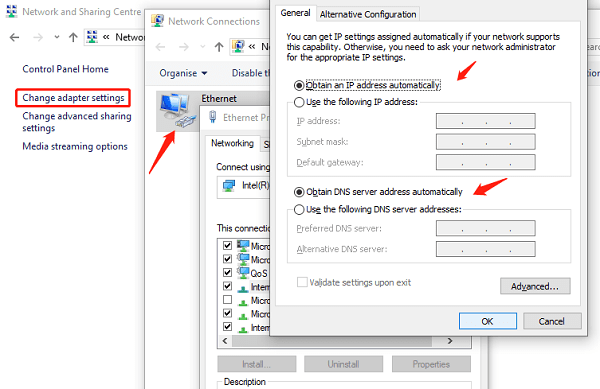
Click "OK" to save the settings.
Close the window and reconnect to the Wi-Fi to see if the problem is resolved.
Method 5: Reset Network Settings (Windows 10/11)
Press Win + I to open "Settings" and go to "Network & Internet".
Scroll down to the bottom of the page and click "Network Reset".
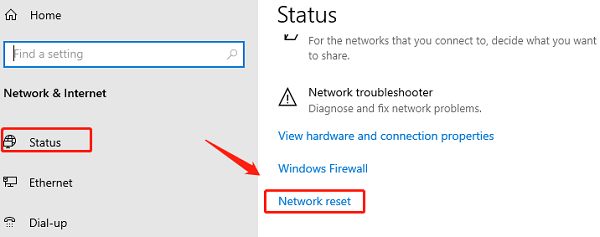
Click "Reset now", and the system will complete the reset in a few minutes, after which the computer will automatically restart.
After restarting, reconnect to the Wi-Fi and check if the IP configuration error is resolved.
Method 6: Re-enable the Network Adapter
Press Win + X and select "Device Manager".
Expand "Network adapters", find your Wi-Fi adapter, right-click it, and select "Disable device".
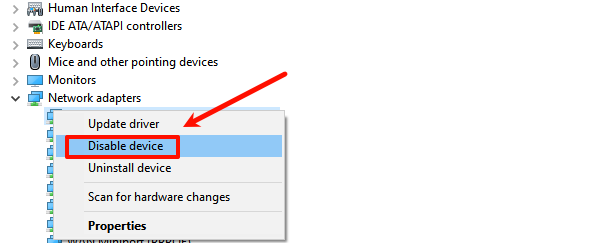
Wait a few seconds, then right-click the adapter again and select "Enable device".
Once enabled, reconnect to the Wi-Fi and check if the issue is resolved.
Method 7: Check Router Settings
Open a browser and type the router's IP address into the address bar, usually 192.168.1.1 or 192.168.0.1 (you can check the label on the bottom of the router for the exact address).
Enter the administrator username and password (usually found on the router's label, e.g., admin/admin; if modified, enter your updated credentials).
After logging into the router settings interface, locate the DHCP settings (usually under "LAN Settings" or "Network Settings").
Ensure the DHCP server is enabled. If not, check the "Enable DHCP Server" option and save the changes.
Restart the router, reconnect to the Wi-Fi, and check if the issue is resolved.
Wi-Fi IP configuration errors are common but can usually be resolved using the methods above. If the problem persists, consider contacting your Internet Service Provider (ISP) or professional technical support for help.
See also:
Guide to Reinstalling NVIDIA Drivers on Windows
How to fix Windows 10 stuck on restarting
How to Fix the Missing NVIDIA Control Panel Issue
6 Ways to Fix HID Compliant Touch Screen Missing
Guide to Fixing Frequent Stardew Valley Crashes on PC

|
ExplorerMax |

|
Driver Talent for Network Card | |
| Smart and advanced file explorer tool for Windows platforms | Download & Install Network Drivers without Internet Connection | |||
| 30-day Free Trial | Free Download |


