How to Fix High CPU Usage by System Interrupts Process
Jun. 23, 2024 / Updated by Seraphina to Windows 10
System interrupts is vital in Windows, managing hardware-to-system communication. High CPU usage by System interrupts signals hardware or driver issues, which degrade system performance and responsiveness.
1. Quick and Simple Methods
You can start by restarting your Windows 10 computer. A full reboot often resolves many unusual issues, so this simple method is worth trying first.
2. Update Hardware Drivers
Outdated or incompatible hardware drivers can cause high CPU usage by System Interrupts. Use Driver Talent to update drivers for components like motherboard, graphics card, and sound card, ensuring they are up to date without the risk of downloading incorrect drivers.
Click the download button to get the latest version of Driver Talent. After installation, open the software and click "Scan".
Once scanning is complete, view the list of drivers that need updating and click "Download".

After updating, restart your computer to ensure the updated drivers take effect.
3. Check Power Management Settings
Incorrect power management settings can sometimes cause high CPU usage by System Interrupts.
Press Win + X keys and select "Device Manager".
Expand the "System Devices" category.
Locate "High Precision Event Timer", right-click it, and select "Properties".
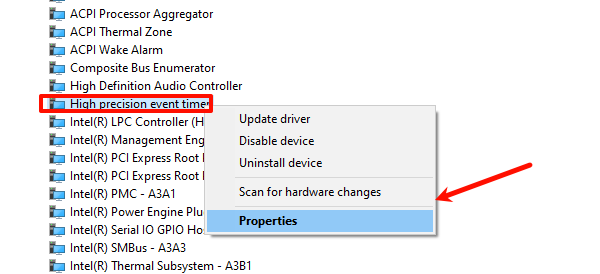
Switch to the "Power Management" tab.
Uncheck "Allow the computer to turn off this device to save power" and click "OK".
4. Check for Interrupt Conflicts
Hardware interrupt conflicts can lead to high CPU usage by System Interrupts.
Press Win + X keys and select "Device Manager".
Expand all device categories and check for devices with yellow warning symbols.
If any device shows a warning symbol, right-click it, select "Properties", and on the "General" tab, check the device status and follow prompts to resolve conflicts.
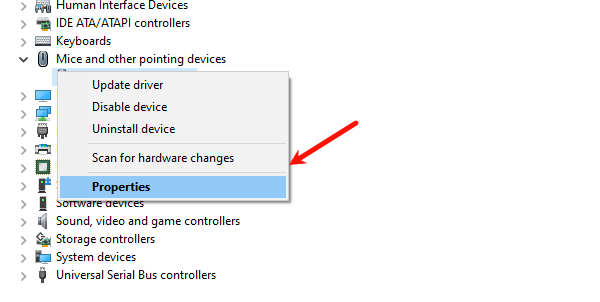
5. Disable USB Root Hubs
USB hardware can also contribute to System interrupts and high CPU issues.
Press Win + X keys and select "Device Manager".
Expand the "Universal Serial Bus controllers" category.
Right-click each USB Root Hub (except those for keyboard and mouse), select "Disable device".

Check if CPU usage decreases.
6. Repair System Files
If the issue persists, it may be due to corrupted system files.
Press Win + X keys and select "Command Prompt (Admin)" or "Windows PowerShell (Admin)".
In the command prompt, type sfc /scannow and press Enter.

Wait for the scan to complete and follow prompts to repair any issues found.
7. Consider System Reset
If none of the above methods resolve the issue, consider resetting your Windows system. This will clear all software issues and restore the system to its initial state:
Press Win + I keys to open "Settings".
Select "Update & Security".
Choose the "Recovery" tab.
Under "Reset this PC", click "Get started".
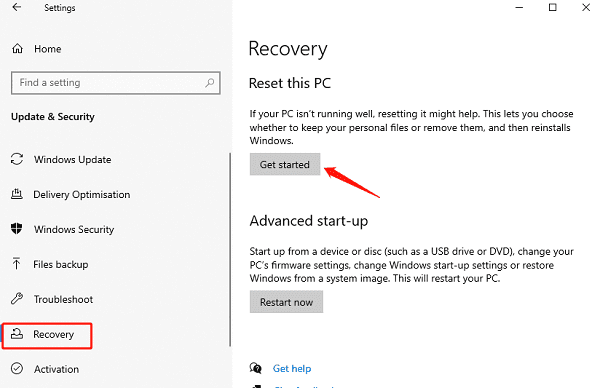
Follow prompts to choose to keep personal files or remove everything, then proceed with the system reset.
By using these methods, you can attempt to resolve high CPU usage by the System interrupts process, ensuring your computer operates normally and improves system performance.
See also:
Six Quick Fixes for No Signal on Monitor
How to Fix Qualcomm Atheros QCA61x4A Driver Issues
Guide to Fixing Sound Card Driver Installation Issues
How to Download Oculus Drivers on Windows 10
8 Ways to Fix Windows 11 No Sound

|
ExplorerMax |

|
Driver Talent for Network Card | |
| Smart and advanced file explorer tool for Windows platforms | Download & Install Network Drivers without Internet Connection | |||
| 30-day Free Trial | Free Download |


