How to Fix Broken PowerShell after Windows 10 Creators Update
Jun. 23, 2022 / Updated by Wendy to Windows 10
The broken PowerShell after installing Windows 10 Creators Update issue is coming to the fore as one of Win 10 CU problems, like blue screen, black screen, high CPU usage etc. Luckily, you are able to fix that PowerShell problem with below workable solutions if your PowerShell font Terminal is broken after Windows 10 Creators update.
Read More: How to Free Upgrade to Windows 10 Creators Update
Method 1. Change the Font to Fix the Windows 10 PowerShell after the Creators Update
According to some users who have complained that the Creators Update breaks the Windows 10 PowerShell, causing the unreadable PowerShell or Windows powershell has stopped working issue can be easily fixed by modifying the font in the Properties. Since Microsoft replaces cmd.exe by PowerShell by default, you can open PowerShell window withthe Windows shortcut keys Win + X and then follow below tips.
1. Launch the PowerShell.
2. Click on top left of the PowerShell window or press the Alt + Space key together to choose the Properties.
3. Go to the Font tab and set the font to anything but Raster Fonts since it has been approved to be the most possible evil in the unreadable Powershell case. (Consolas at size 14-16 is said to be the best choice).

4. Click OK to save the changes.
Note: Please note that the font, Lucida Console means no helps in troubleshooting broken Windows 10 Powershell for the Creators Update. So you’d better set the Consolas font here.
Then you should be able to use the Windows PowerShell or Command Prompt without messy characters or code gibberish but a legible text!
Method 2. Reinstall the Net.Framework to Repair the Broken PowerShell for Windows 10 Creators Update
Should changing the font turn out useless on the broken PowerShell bug in Windows 10 CU, you should consider reinstalling your .Net Framework since something may go wrong with it during the course of the Windows OS upgrade, leading to powershell has stopped working error Windows 10. To reinstall it, you should uninstall the current .Net Framework installed on Windows 10 Creators Update. Below are the detailed steps.
1. Press Win + X to open the Control Panel, and then select Apps & Features -> Programs & Features.

2. Locate the programs named Microsoft .Net Framework and choose Uninstall to remove them all.

3. Restart your computer.
To download and install the .NET Framework you have two channels as below. If you prefer a quick and efficient way to do so, please go directly to option 2.
Option 1. Download the .NET Framework for the Creators Update via Microsoft Website
The .Net Framework downloads can be obtained from Microsoft official Website. Simply Visit the link, and then click the Download button on that page to download the .Net Framework. Run PowerShell again after re-installing the .Net Framework to check whether the PowerShell problem in the Creators Update is resolved.
Option 2. Repair .NET Framework for Windows 10 Broken PowerShell Issue with Driver Talent
To save you time and energy, it is recommended to use a professional tool named Driver Talent to install the .Net Framework for Windows 10 since it could automatically detect the incorrect .Net Framework and fixes it with just one-click.
Click the button below to get Driver Talent instantly.
1. Click Scan to identify possible driver issues.

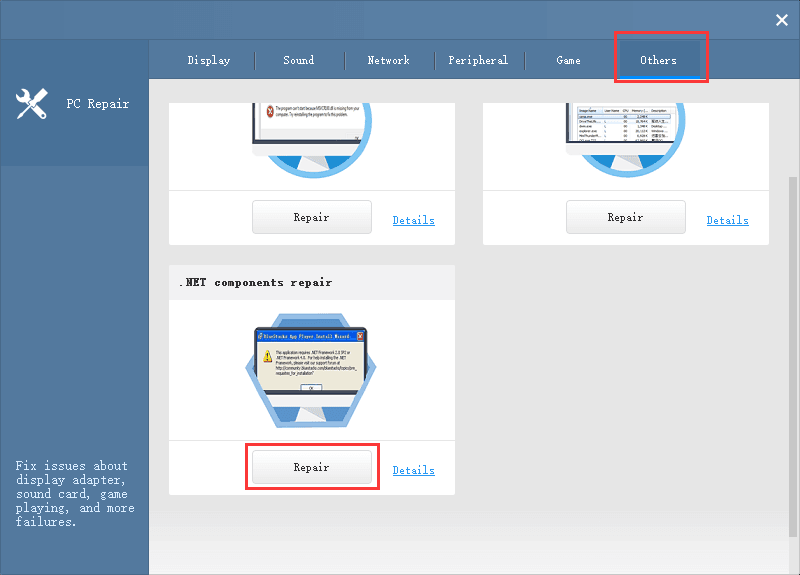
2. Click “Download” or “Update” to install the best-matched drivers, and you can see a Toolbox option in “Advanced” column. Then select PC Repair.

3. Click Repair to download the .Net Framework file and fix the Broken PowerShell error for your Windows 10 Creators Update computer.

See Also:
How to Download and Install Microsoft .Net Framework for Windows 10
How to Fix .Net Framework Error on Windows 10
Hope this article helps you get rid of broken PowerShell bug after Windows 10 Creators Update. If you have more workarounds on the Windows 10 PowerShell hitches, please share with us in the comments section or in the OStoto official forum.

|
ExplorerMax |

|
Driver Talent for Network Card | |
| Smart and advanced file explorer tool for Windows platforms | Download & Install Network Drivers without Internet Connection | |||
| 30-day Free Trial | Free Download |


