Fix 802.11n WLAN/WiFi Adapter Not Working on Windows 10
Jun. 23, 2022 / Updated by Helia to Windows 10
802.11n WLAN adapter not working is one of the network or WiFi issues after the Windows 10 upgrade or update like Fall Creators Update, Creators Update, Anniversary Update, etc. In this case, Windows users fail to connect to wireless or network supporting 802.11n, which interrupts their office work or other networking usage, like the Microsoft Edge not working or the Google Chrome not working.
What is 802.11 WLAN Standard and What is 802.11n WLAN Adapter Used for
802.11 is a standard for WLAN communications, which provides the basis for wireless network products using the Wi-Fi brand. There are several specifications in the 802.11 family, including 802.11a, 802.11b, 802.11g, 802.11n, 802.11ac, etc.
If your wireless router or USB WiFi adapter supports 802.11n, it is able to work in both the 2.4 GHz and 5 GHz frequency bands and increase the network transmission speeds. But if you encounter the 802.11n WLAN adapter not working or "This device cannot start (Code 10)" issue, the network will be slow or there will be no WiFi or unidentified network or "No Internet, secured" error.
See Also:
How to Fix 802.11n WLAN Adapter Not Working Issue
We've had top 4 methods for you to fix 802.11n WLAN adapter/WiFi not working on your computer running Windows 10 Fall Creators Update/Creators Update/Anniversary Update. Follow the workarounds below to enable 802.11n connection and improve the network speed.
Method 1: Update 802.11n WLAN adapter driver for Windows 10
Outdated 802.11n driver will cause various WiFi issues, including the 802.11n wireless LAN card not working. Besides, it will also result in computer problems like random restarts, Windows 10 slow boot issue, 100% disk usage, etc. You can update the 802.11n WLAN adapter driver manually or with a one-click solution.
Manually Update the Driver
Step 1. Go to the Device Manager and find your 802.11n WLAN adapter.
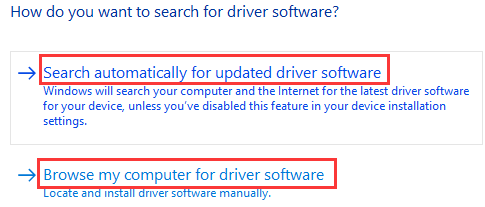
Step 2. Right click on it and select Update Driver Software.
Step 3. Both the two choices are available. You could make Windows update the driver, but if it fails to do that, you need to download and install the driver with the second option.

Automatically Update the Driver
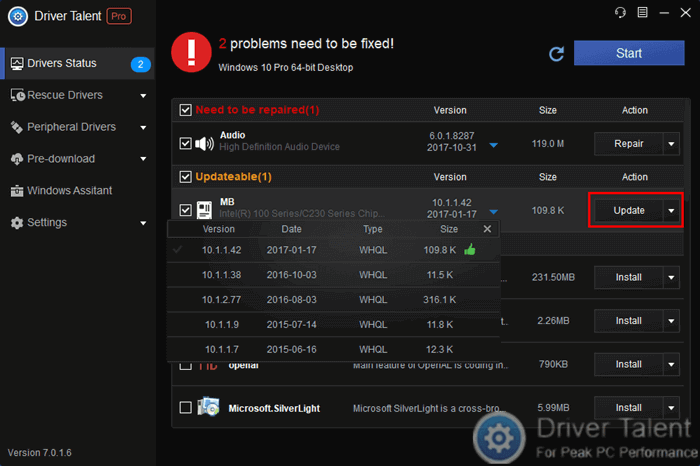
If Windows fails to update the driver, or if you fail to download the correct 802.11n WLAN driver update for your Windows 10, you can use Driver Talent, with which you can one-click update the driver instantly and save your time on this issue.
Click the button below to directly download such safe Windows 10 driver troubleshooter.
Here are 3 easy steps to update the driver:
Step 1. Launch Driver Talent and click on the Scan to detect faulty drivers.

Step 2. Click on the Update to download and install the latest 802.11n driver.

Step 3. Restart the PC to ensure the new driver takes effect.
After the update has finished, repeat method 3 to enable the 802.11n mode and see if the 802.11n WLAN adapter not working issue still persists.
Method 2: Check Hardware Related to the 802.11n WLAN Adapter
First and foremost, you need to check hardware related to the 802.11n WLAN adapter.
1. Check the wireless router. Make sure the device is connected correctly. A reset of the router can also be helpful.
2. Make sure the switch button of the wireless card has been ON, or the 802.11n USB WiFi adapter is right in the port. You can also plug the wireless card out and then re-plug it in. Note: If the WLAN adapter is too old, it may not be able to support 802.11n. So use a new one to replace it.
3. Make sure the PC is working in an appropriate WiFi environment. You can also contact with your network operator for the current network condition.
This related article may also interest you:Fix “WiFi Doesn’t Have a Valid IP Configuration” on Windows 10
Method 3: Troubleshoot 802.11n WLAN Adapter Not Working Issue via Windows
Windows 10 provides a handy tool, Troubleshooting, with which you can make Windows scan fix some network issues like no WiFi error, no web page access problem, WiFi adapter not working issue, etc. automatically. You can find the tool in the Control Panel, but here's an easy way to access to it.
Step 1. Right click on the network or WiFi icon in the notification area.
Step 2. Select Troubleshoot problems.

Step 3. Choose I'm having a different problem form the pop-up dialog box.
Step 4. Choose Use a specific network adapter.

Step 5. Select the adapter WLAN.
Step 6. Click on the button Next.
Step 7. Choose Apply this fix if Windows notice you 802.11n WLAN adapter related information. Or follow the onscreen steps to fix the problem.
These WiFi-related posts may also interest you:
Method 4: Enable the 802.11n Mode Wireless Connection
If the 802.11n mode in the wireless settings is disabled by default, it can also result in the 802.11n WLAN adapter not working issue. So go to the Network Connections and do the following check:
Step 1. Use Windows shortcut keysWin + X to launch the Jump List.
Step 2. Select Network Connections.
Step 3. Right click on your WLAN adapter and select Properties.
Step 4. When the dialog box pops up, click on the Configure button.
Step 5. Choose the Advanced tab.
Step 6. Navigate to the 802.11n Mode from the list.
Step 7. Highlight the mode and select Enable from the drop-down menu of Value.

If the 802.11n Mode doesn't appear, you need to update the firmware or the 802.11n WLAN adapter driver.
These WiFi-related posts may also interest you:
See Also: How to Download 802.11n WLAN Driver for Windows 7
Hope this helps you fix the 802.11n wireless LAN card not working issue and make your WiFi available again. If you still fail to fix the 802.11n WLAN adapter not working issue on Windows 10 with the methods above, you can go to the LEFT MENU for special technical support or comment below. If you have any other Windows 10-related issues, comment below or check for solutions in Windows 10 Issues and Fix.

|
ExplorerMax |

|
Driver Talent for Network Card | |
| Smart and advanced file explorer tool for Windows platforms | Download & Install Network Drivers without Internet Connection | |||
| 30-day Free Trial | Free Download |


