Six Methods to Resolve Laptop Charging Issues
Jun. 05, 2024 / Updated by Seraphina to Windows 10
Discover six effective methods to fix laptop battery charging issues, common among Dell users. Overcome this annoyance and keep your device powered up.
Problem Description
Many users using Dell laptops find that the battery fails to charge to 100% after connecting the charger. The battery percentage may remain at 75%, 85%, or 98%, even after being left to charge overnight. This problem can stem from various reasons, including hardware faults, charger issues, driver or system configuration errors, etc.
Method 1: Test Another Charger
To rule out charger issues, you can try the following steps:
Check if your original charger is functioning correctly. If possible, test with a spare charger.
If a spare charger is unavailable, test your charger on another laptop to verify its functionality.
Method 2: Update Battery Drivers and BIOS
Outdated or incompatible drivers and BIOS may cause battery charging problems:
1). Using Driver Talent Tool
The Driver Talent driver management tool can automatically update drivers and BIOS to ensure system compatibility and stability.
Click the download button to obtain the latest version of Driver Talent, install the software, open it, and click "Scan".
After scanning, it will display which drivers are not installed or need updates. Click the "Download" button.
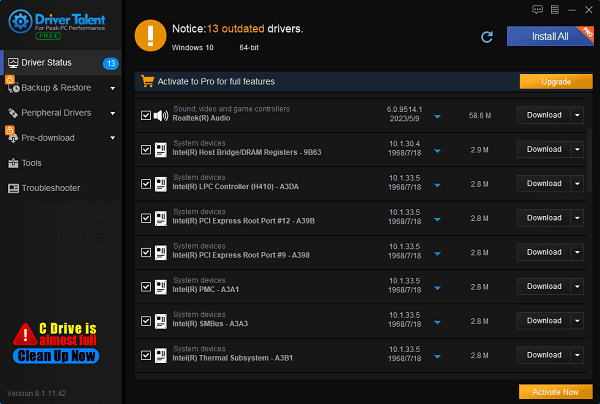
After updating, it's advisable to restart the computer to ensure the updated drivers take effect.
2). Using Device Manager
(1). Open Device Manager
Type "Device Manager" in the Windows taskbar search box and click to open.
Alternatively, press Win + X shortcut keys, then select "Device Manager".
(2). Locate the battery option
In the Device Manager window, expand the "Battery" option.
You will see "Microsoft ACPI-Compliant Control Method Battery" and "Microsoft AC Adapter".
(3). Uninstall the driver
Right-click the "Microsoft ACPI-Compliant Control Method Battery" option.
Select "Uninstall device".
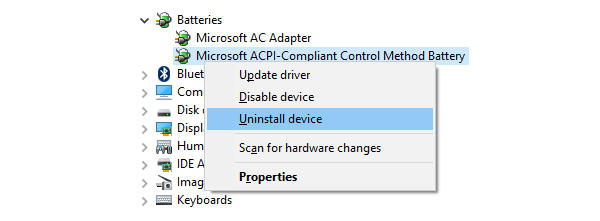
When the confirmation window pops up, check the "Delete the driver software for this device" option, then click "Uninstall".
3). Restart the computer to automatically reinstall the driver
(1). Restart the computer
After uninstalling the driver, close all applications and restart the computer
The system will automatically detect and reinstall the "Microsoft ACPI-Compliant Control Method Battery" driver during the reboot.
(2). Verify driver reinstallation
After the restart, open Device Manager and check if "Microsoft ACPI-Compliant Control Method Battery" is displayed under the "Battery" option.
If the driver has been successfully reinstalled, you will see this option.
4). Download and Install the Latest BIOS from Dell's Official Website
(1). Visit Dell Support
Open your browser and go to the Dell support page: Dell Support
(2). Select your product
On the support page, enter your Dell laptop's model or service tag (usually located at the bottom or inside the battery compartment).
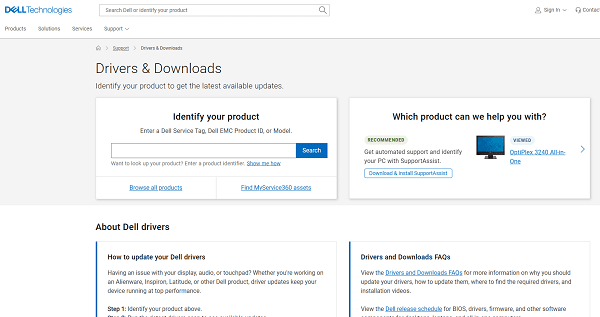
Alternatively, click "Browse all products" and manually select your device.
(3). Download the latest BIOS
After accessing your device's support page, click on the "Drivers & Downloads" option.
In the "Category" drop-down menu, select "BIOS".
Find the latest version of BIOS update and click "Download".
(4). Install BIOS
Once the download is complete, locate the downloaded BIOS update file (usually a .exe file).
Double-click to run the file and follow the on-screen instructions.
The installation process may take some time, and the system may restart multiple times, so avoid interrupting it.
(5). Verify BIOS update
After installation, you can press F2 during boot-up to enter BIOS settings and check if the BIOS version has been updated to the latest version.
Method 3: Remove All External Devices
External devices may affect charging efficiency.
Disconnect all external devices, including smartphones, USB external hard drives, mice, printers, etc.
Observe if the battery charging situation improves. If external devices have an impact on charging, try to avoid connecting these devices while charging.
Method 4: Use Windows 10 Troubleshooting Tools
The built-in troubleshooting tools in Windows 10 can help resolve charging issues:
Use the Win + I shortcut keys to open Settings.
Go to the "Update & Security" menu.
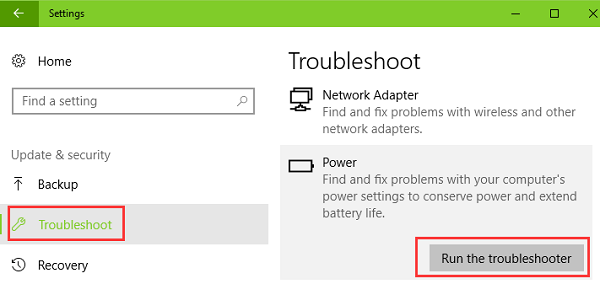
Select the "Troubleshoot" option.
Run the "Power" troubleshooting tool and follow the prompts.
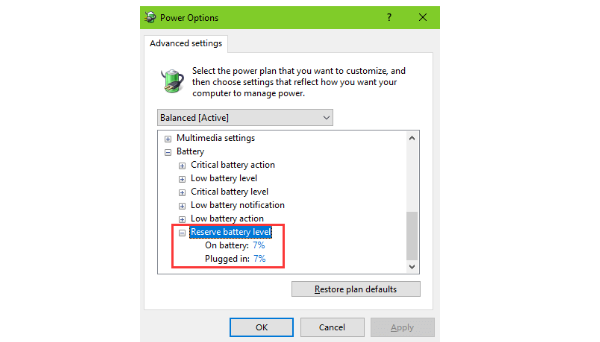
Method 5: Configure Power Options to Calibrate the Battery
Incorrect power configurations may cause charging problems:
Right-click on the battery icon on the taskbar and select "Power Options".
Click on "Change plan settings" next to the current power plan.
Select "Change advanced power settings".
Expand the "Battery" option and adjust the "Battery saver" percentage to the appropriate value.
Method 6: Check if the Connectors are Dirty or Damaged
Dirty or damaged charging connectors may also prevent the battery from charging:
If your laptop has a removable battery, remove the battery first.
Check the contact points of the battery and battery compartment, and clean any dirt or dust.
Check if the charging port has any dust or foreign objects, and clean it using compressed air or a soft brush.
By following these six methods, you should be able to resolve the issue of Dell laptop battery not charging. Regularly checking and maintaining your laptop battery can not only extend its lifespan but also ensure that your device is always in optimal working condition. If you still can't resolve the problem after trying the above methods, please contact Dell customer service or seek assistance from professional technicians.
See also:
How to Enhance Network Connection Stability Using Network Cards
How to Fix Missing Icons on Computer Desktop
Methods to Fix Disappearing Mouse Arrow
Why Driver Updates Are Crucial
Simple Steps to Get Your Drivers Downloaded

|
ExplorerMax |

|
Driver Talent for Network Card | |
| Smart and advanced file explorer tool for Windows platforms | Download & Install Network Drivers without Internet Connection | |||
| 30-day Free Trial | Free Download |


