If you encounter audio issues on your Windows 11 computer, reinstalling the Realtek HD Audio Manager can help. This guide offers detailed steps to fix audio problems and restore smooth performance.
1. How to Find Realtek HD Audio Manager
Open the Windows Control Panel and switch to either "Large icons" or "Small icons" view.
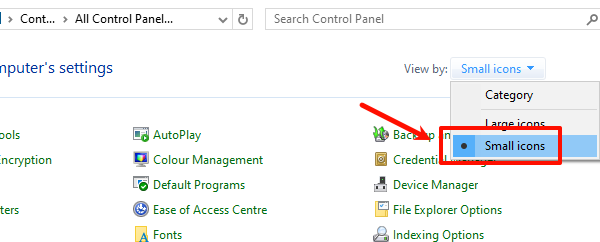
Locate and click on "Realtek HD Audio Manager".
2. What to Do if You Can't Find Realtek HD Audio Manager
1). Search in File Explorer:
If you can't find it in the Control Panel, go to C:\Program Files\Realtek\Audio\HDA.
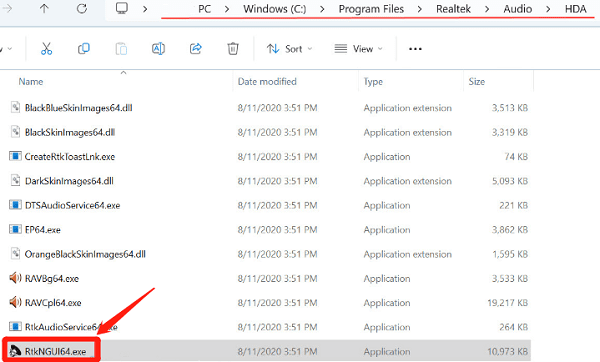
Find and double-click on "RtkNGUI64.exe" to open the Realtek HD Audio Manager.
2). Run as Administrator:
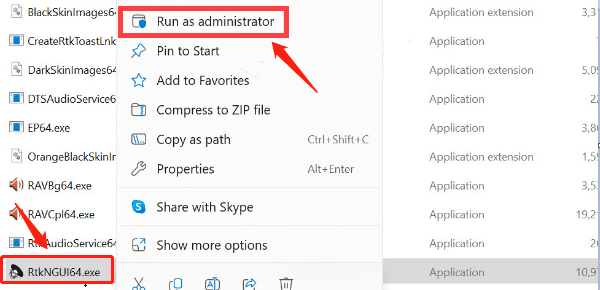
If double-clicking it has no effect, right-click on RtkNGUI64.exe and select "Run as administrator".
3). Check Device Manager:
Open Device Manager and check under "Sound, video and game controllers" to see if the Realtek device is working properly.
If there's a yellow exclamation mark, you may need to update or reinstall the driver.
3. Installing Realtek HD Audio Manager
Method 1: Automatic Installation
Outdated, damaged, or incompatible audio drivers may cause your computer's audio to malfunction. It's recommended to use Driver Talent to automatically detect and update drivers, saving time and avoiding the risk of downloading or installing the wrong drivers.
Click the download button to get the latest version of Driver Talent. After installation, open the software and click "Scan".
Once the scan is complete, it will display any drivers that need to be installed or updated. Find the Realtek HD driver in the results list and click "Download".
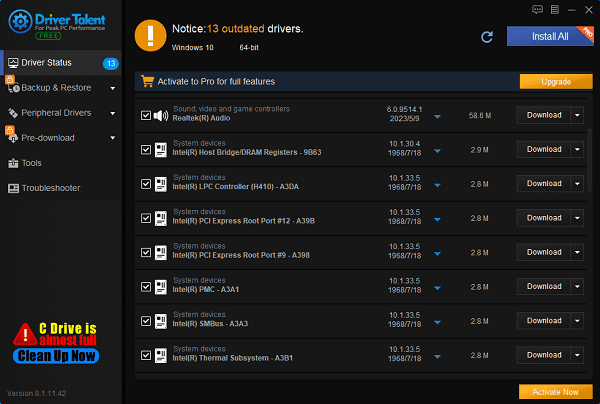
After updating, it's recommended to restart your computer to ensure the updated drivers work properly.
Method 2: Manual Installation
Step 1: Uninstall Existing Audio Drivers:
Press Windows + X and select "Device Manager".
In Device Manager, expand "Sound, video and game controllers".
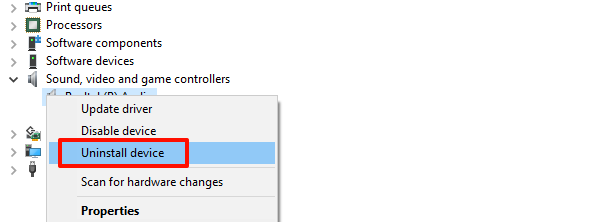
Find "Realtek High Definition Audio" or a similar option, right-click on it, and select "Uninstall device".
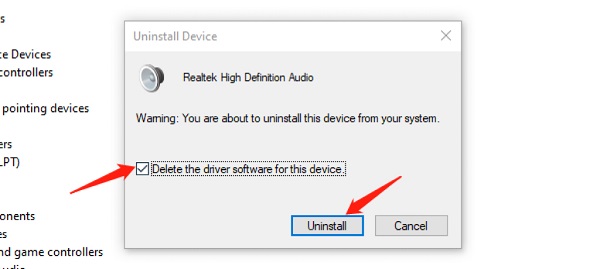
Check "Delete the driver software for this device" and then click "Uninstall".
Step 2: Download the Latest Realtek Audio Drivers:
Go to your computer or motherboard manufacturer's official website and find the drivers download page.
Search for your device model, select the compatible operating system, and download the latest Realtek HD audio driver.

Step 3: Install the Audio Driver:
Open the downloaded driver installation package and follow the on-screen instructions to install the driver.
The installation process may require several restarts to ensure all components are installed correctly.
Step 4: Verify Installation and Enable Audio Manager:
After installation, restart your computer.
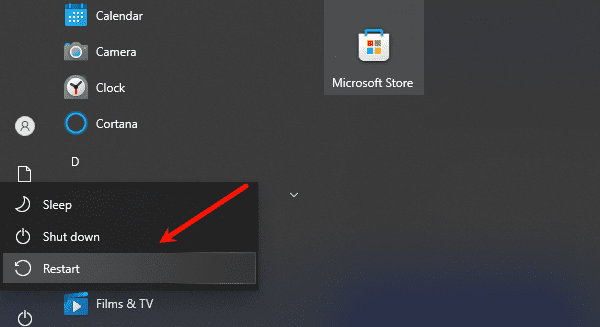
Press Windows + S and search for "Realtek HD Audio Manager".
If it doesn't start automatically, you can configure and adjust it via the Control Panel or the audio icon in the taskbar.
After reinstalling Realtek HD Audio Manager, your audio settings should return to normal. Regularly backing up drivers and system settings is also a good practice to prevent future issues. These steps will help you maintain optimal audio performance on your Windows 11 system.
See also:
Downloading Methods for Bluetooth Drivers for PC
4 Ways to Add Bluetooth Icon to Taskbar on Windows 11
Top 5 Solutions for Laptop Keyboard Not Typing Letters


