[Solved] Unable to surf the Internet after win10 2004 update
Jun. 23, 2022 / Updated by Daphne to Windows 10
The Windows Ocotober 13, 2020 update has fixed the major bug in Microsoft's July monthly patch, but it seems that the update has another unresolved issue. Microsoft has confirmed that Windows 10 version 2004 is displayed on some PCs False Internet connection warning.
Recently, a lot of users reported the Internet not working issue in Windows 10, as below:
Internet is shown to be connected but Internet doesn't work. No Internet access.
My Internet is connected but browser is not working after Windows 10 update.
WiFi is connected but Internet is not working. No Internet connection.
Internet is connected but no web page access in Windows 10.

Users report that a scary yellow triangle appears on the system tray, and annoyingly, they say "no Internet access". This error will appear when your device is properly connected to the router, but it seems that Windows 10 cannot connect to the Internet. One user pointed out, “I have restarted the laptop, reset the router, and reinstalled the network wireless adapter, but the same message is still the same,” other users also confirmed this.Although you will be able to browse the web in your browser, it seems that applications such as Spotify, Cortana, Microsoft Store and even Feedback Hub rely on the Internet status of Windows 10 to access the server. In other words, when you receive a wrong internet connection warning, Spotify and other apps may not work.Don’t worry, you can get 7 solutions from this article and fix this annoying problem.
Top 7 ways from this article and fix this annoying problem
Way 1. Use troubleshooter
Step 1. Search [Control Panel] and open [Network and Internet].

Step 2. Click [View network status and tasks].

Step 3. Go to [Troubleshoot problems].

Step 4. Get up and running [Internet Connections].

Way 2. Change the DNS server address
Step 1. Repeat step 1 and step 2 of Way 1.
Step 2. Click [Change adapter settings] on the left.

Step 3. Right-click on the network connection and select[Properties].
Step 4. Find and double-click to open the [internet protocol version 6].

Step 5. Check [Use the following DNS server address]. Enter 4.2.2.1 in the [Preferred DNS server], Enter 4.2.2.2 in the [alternate DNS server], and click OK.
You may also like to check out:
How to Fix Windows 10 WiFi Problems
How to Fix "No Internet, Secured" WiFi Problem in Windows 10
Top 4 Ways to Fix Slow Internet after Windows 10 Update
4 Ways to Fix Err_Internet_Disconnected Error in Windows 10
3 Ways to Fix DNS_Probe_Finished_No_Internet Error in Windows 10
Way 3. Update Network Adapter Driver
If your wireless adapter driver is outdated, the Internet not working problem could also occur. It’s highly recommended to use a driver update utility like Driver Talent to perform a free scan of your driver status. Once your network driver is outdated, corrupt, broken or missing, it could automatically update your outdated driver and repair your corrupt driver in few seconds.Click the download button below to grab Driver Talent directly. No viruses. No trojans.
Step 1. Scan Your PC
Launch Driver Talent. Click “Scan" to detect all your PC drivers.

Step 2. Update Drivers to Fix Internet Not Working
Click “Update” to update your outdated network adapter driver. Click “Repair" to fix other identified problematic drivers immediately.

Way 4. Enter the computer reset command
Step 1. Press [Win + X] and open [Windows PowerShell(Admin)].

Step 2. Then directly enter [netsh winsock reset] and press Enter to reset the network.

Step 3. Restart your computer to complete the reset.
Way 5. win10 system refresh DNS cache
Step 1. Press and hold [Win + S] at the same time, enter [cmd] and click Enter. Right-click the command prompt, click [Run as administrator].

Step 2.Enter [ipconfig /flushdns] and click enter.

Way 6. Modify the limit t oreserve the bandwidth
Step 1. Press Win + R, enter [gpedit.msc] and click Enter.

Step 2. Open the computer configuration, select Windows settings, then find and right-click on the [policy-based QoS] on the right, and select [Advanced QoS settings] by Right-click.
Step 3. Open the [Advanced QoS settings], switch to [inbound TCP traffic], check the specified inbound TCP throughput level, and select [level 3] (maximum throughput), and finally click OK.

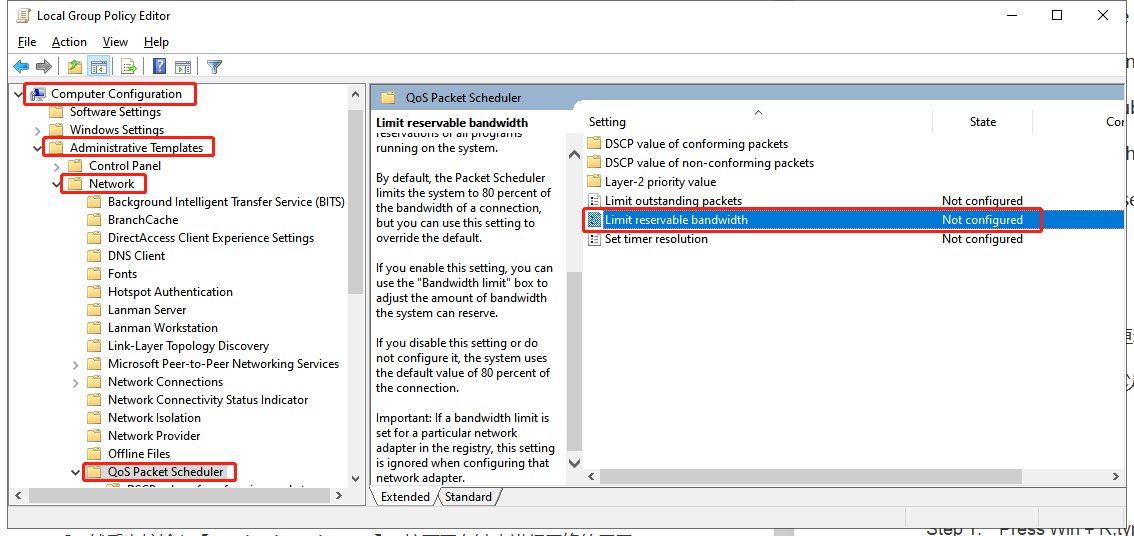
Step 4. Return to the local group policy editor window, expand in order: [Computer Configuration]-[Administrative Templates]-[Network].
Step 5. Then find it under the [Qos package scheduler] and double-click to open the [Limit to reserve the bandwidth].

Step 6. Enable the [Limit to reserve the bandwidth], modify the bandwidth limit of the option below to[ 0], and confirm to save.

Way 7. Clean up the hosts file
Step 1. Find the hosts file and delete it directly. After deleting the file, restart the computer to complete the reset. The location of the hosts file is [C:\Windows\System32\drivers\etc\host]

These Internet Connection-related Posts May Also Interest You:
5 Ways to Fix WiFi “No Internet, Secured” Issue on Windows 10 Creators Update
3 Ways to Fix DNS_Probe_Finished_No_Internet Error in Windows 10
That's it. If you still can't solve the "Internet connected but no web page access" issue or if you have other browser or network connection problems, you can comment below or click the LEFT MENU on this site for more help. Any other Windows 10-related issues, please go to Windows 10 section on this site or our blog for solutions.

|
ExplorerMax |

|
Driver Talent for Network Card | |
| Smart and advanced file explorer tool for Windows platforms | Download & Install Network Drivers without Internet Connection | |||
| 30-day Free Trial | Free Download |


