How to Fix the No Audio Error on Windows 11
Dec. 23, 2024 / Updated by Seraphina to Windows 11

No audio on Windows 11 is a common issue. Here are some solutions to help you restore sound quickly.
1. Update Audio Drivers
Outdated or corrupted audio drivers are often the main cause of no audio on Windows 11. Updating the driver can help restore audio functionality. It is recommended to use Driver Talent to automatically detect and update drivers, saving time and avoiding the risk of downloading or installing incorrect drivers.
Download the latest version of Driver Talent, install the software, and open it. Click "Scan".
After scanning, the results will display missing or outdated drivers. Locate the audio driver in the list and click "Download".
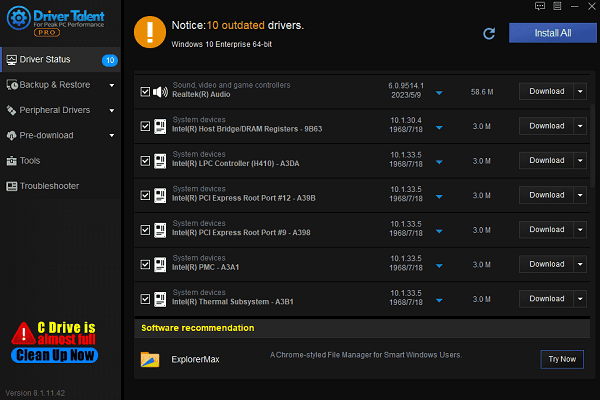
After the update is complete, restart your computer to ensure the updated driver takes effect.
2. Restart Audio Services
Press Win + R, type "services.msc", and press Enter.
In the Windows Services list, locate the following services:
Windows Audio
Windows Audio Endpoint Builder
Right-click Windows Audio and select "Restart".
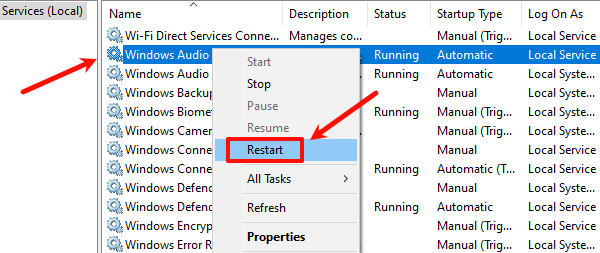
Right-click Windows Audio again and select "Properties".
In the "Startup Type" dropdown menu, select "Automatic", click "Apply", and confirm.
Restart the services and test if the audio functionality is restored.
3. Check Volume Levels
Press Win + I to open Settings, then navigate to "System" > "Sound".
Scroll down to the output options and ensure the volume is not muted.
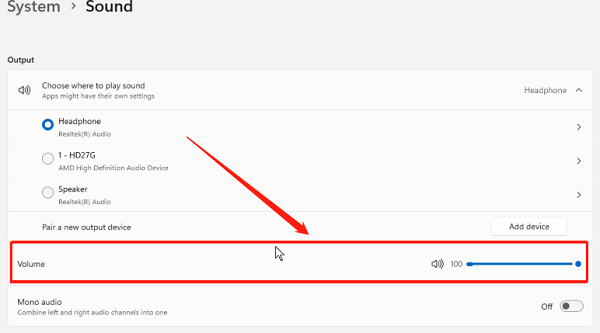
Right-click the volume icon in the taskbar and select "Sound Settings".
Under "Output Device", select the correct audio device.
Test the volume output to ensure the levels are not locked.
Open "Control Panel" > "Sound".
In the Playback tab, right-click the audio device and select "Test" to check for sound output.
4. Disable Audio Enhancements
Press Win + I to open Settings.
Navigate to the "System" tab, select "Sound", and click "All Sound Devices".
Select the "Properties" of your audio device, scroll down to find "Audio Enhancements", and set the dropdown menu to "Off".
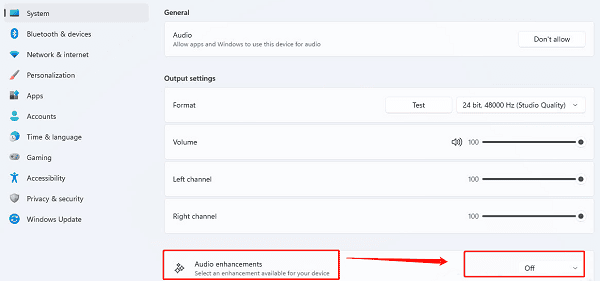
After completing these steps, test if the audio is functioning properly.
5. Run Windows Audio Troubleshooter
Press Win + I to open "Settings", and go to "System" > "Troubleshoot" > "Other Troubleshooters".
Find the "Audio" option and click "Run".
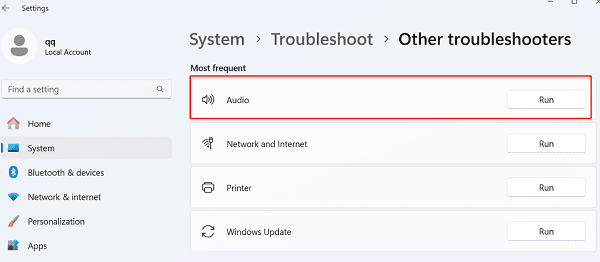
Follow the on-screen instructions to allow the system to detect and fix audio issues.
After troubleshooting, restart your computer and test the audio functionality.
6. Check Hardware Connections
Ensure that your headphones or speakers are properly connected to the computer's audio port.
If using Bluetooth devices, ensure they are successfully paired and maintain a stable connection.
Connect your audio device to another computer to check if it works properly.
For wired connections, try replacing the audio cable or using a different port to rule out hardware issues.
These steps can help you resolve no audio issues on Windows 11. If the problem continues, contact technical support for help.
See also:
Methods to Resolve Missing PCI Device Driver Issue
How to Fix Windows 10 Error Code 0x80072F8F
Fix Windows 10 Audio Services Not Running Error
6 Methods to Fix No Sound on Windows 11
How to Fix Windows 10 Missing Network Adapter

|
ExplorerMax |

|
Driver Talent for Network Card | |
| Smart and advanced file explorer tool for Windows platforms | Download & Install Network Drivers without Internet Connection | |||
| 30-day Free Trial | Free Download |


